Pages

Showing posts with label animals. Show all posts

Tuesday, 24 December 2013

Large Wall Art (Older Children and Adults)

Creates a Christmassy glow in any room!

These are created with big sheets of paper or paper sellotaped together. The shapes/characters are drawn and painted. Once dried, they're cut out and stuck on the walls. These are great for small children, but are better if they're made by children aged 9 years + or adults.

Santa
My very first design, inspired by the nursery I was a student at.

Penguin
Creates the wintery feel in our dining room

Rudolph The Red Nosed Reindeer


Snowman
Helping create a wintery feel in our dining room

A Jolly Elf!

Christmas Tree
The presents and the star are extras and blue tacked to the wall

Handprint Robin

Adorably sweet little Robins!

You will need:

~ Brown and red paint
~ Googly eyes
~ Paper
~ Scissors
~ Glue
~ Paintbrush

Method:

1) Paint a brown oval on a sheet of paper
2) Make 2 brown handprints on another sheet of paper. Allow to dry.
3) Cut out the handprints and oval. Glue the handprints to the oval to make the wings. 
4) Paint a red oval on the brown oval to make the red middle
5) Glue on googly eyes

This craft is suitable for 2 1/2 years + with guidance and supervision

Footprint Reindeer

A sweet little memory of your little one's Christmas!

You will need:

~ Brown, yellow and red paint
~ Paintbrush
~Googly eyes
~ Paper
~ Scissors

Method:

1) Make a brown footprint on the paper
2) Mix brown and yellow paint to create the colour for the antler. Paint on antlers from the heel
3) Paint a red circle at the toes for the red nose
4) Glue two googly eyes to the footprint
5) Once dry, cut out

Allow children to use other colours and add decorations or glitter

This craft is suitable for 12 months + with assistance. 6 years + with supervision.

Sunday, 1 December 2013

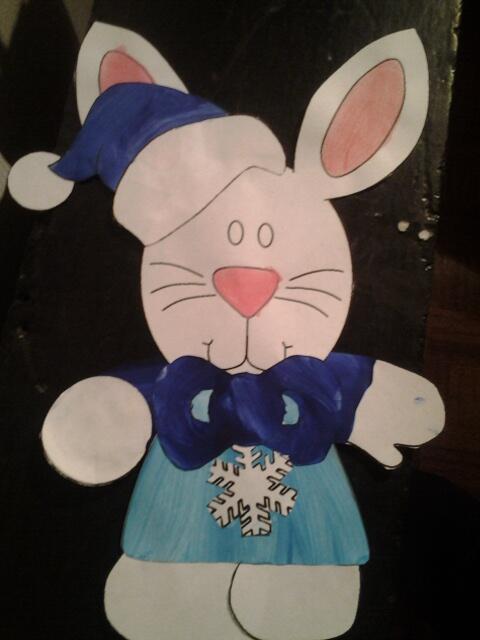
Winter Bunny

A simple craft for children of all ages! Idea taken from DLTK.com

You Will Need:

~ Printer
~ Paper
~ Scissors
~ Paint, pens, pencils (our bunny was painted). Light blue, dark blue and pink
~ Glue
~ Glitter (optional)

Method:

  • Print out the template of choice.
     
  • Colour (where appropriate) and cut out the template pieces.
     
  • Glue the bunny together in the following order (refer to the small 'finished craft' image on the template for further guidance):
     
    • glue the big foot onto the back of the body, so the straight edge of the foot lines up quite evenly with the edge of the body.
       
    • glue the small foot onto the back of the body/big foot, so the curved edge of the foot lines up quite evenly with the edge of the body.
       
    • glue the arms on, positioning as you prefer.  If you glue the arm on the curved side of the dress BEHIND and the arm on the straight side of the dress ON TOP it gives the bunny a 3D look
       
    • glue the head on top of the body
       
    • glue the hat onto the head
       
    • glue the bow on top of one of the ears for a girl bunny or underneath of the chin for a boy bunny.
       
    • glue the snowflake to the center of the body
       
    • glue the snowball into one of the hands
       
  • See picture on the template for further help

Templates are available here


This craft is suitable for 2 years +, as long as they have help cutting out some of the shapes.

Allow children to use different coloured paints to the ones we used, or add decorations to it. Don't add the snowflake and you can use the bunny craft all year round!

Tuesday, 5 November 2013

Painted Bats

Our bats were made for Halloween, but could also be used for nocturnal creatures

You will need:

~ Printer
~ Paper
~ Black paint

Method:

1) Print a template of a bat (we got ours from google and increased the size in Microsoft Word)
2) Paint the bat
3) Cut out when dry

This is suitable for 18 months +

Bats do not have to be black and can be painted any colour the child wishes. You can add decorations or googly eyes to the bat.

Handprint Spiders

These were made for Halloween. They are not entirely my idea, but borrowed from a local nursery.

You will need:

~ Black and white paint
~ Paper
~ Googly eyes (optional)

Method:

1) Paint the child's hand and 4 fingers black. Do not paint the thumb! (Spiders only have 8 legs!)
2) Press the child's hand onto the paper (to create a body and 4 legs). Press their hand again on top of the first handprint, with their fingers facing the opposite way (to create 8 legs)
3) Wait for the handprints to dry. Either finger paint white eyes onto the spider, or use googly eyes.
4) Cut out and hang on the wall.

This craft is good for 1 year + with lots of supervision.

Spiders do not have to be black and can have as many eyes as the child desires. Hole punch spiders and tie string/ribbon/fishing line through them to hang them from the ceiling.